|
|
Journal Home Contents Preview Next |
Pro Otology
Balkan Journal of Otology & Neuro-Otology, Vol. 2, No 2:73-76 © 2002
All rights reserved. Published by Pro Otology Association
Our Expierence with COMBI 40+ Cochlear Implants. Surgical Aspects
Iv. Tzenev, K. Kunev
Clinic of Otorhinolaryngology, MBAL "Tsaritsa Ioanna", Medical University Sofia, Bulgaria
ABSTRACT
Objective: We'd like to share our surgical experience, tips, difficulties, disappointments, and victories with implementation of MedEl's Combi 40+ cochlear implants.
Study design: The study design was a retrospective case review.
Setting: I ENT Clinic, MBAL "Tsaritsa Joanna", Medical University - Sofia, Bulgaria.
Patients: 3 cases from 18 patients between 2,7 and 4 years old with profound bilateral sensoneural hearing loss, established soon after delivery.
Main outcome measure: These included treatments of patients and postoperative results extended in time.
Results: Intraoperative and postoperative findings and conclusions had revealed that close relation between canalis osseus n. facialis and chorda tympani, can produce technical difficulties especially among children with thin squama temporalis. Moreover it's crucial to make preliminary flap modeling to avoid possible necrosis of skin that covers the implant body.
Conclusion: Though extremely sophisticated the cochlear implementation is the only alternative for individuals with profound hearing impairment with preserved auditory nerve functions.
Key Words: Cochlear implants, Skin necrosis, Flap modeling.
Pro Otology 2: 73-76, 2002
INTRODUCTION
A relatively recent clinical development of the cochlear implant was a viable alternative to conventional amplification for individuals with profound hearing impairment. Several types of cochlear implants are available commercially today. They all share a common conceptual framework but differ in its implementation. This is a device that is surgically implanted, with its stimulating electrodes (wires) inserted directly into the cochlea (scala timpani). Electrodes are used to stimulate the auditory nerve directly with electric current, bypassing the damaged cochlear structures. As in the conventional hearing aid, a microphone is used to convert the acoustical signal into an electric one. The electrical signal is then amplified, digitized, and processed in a special external hearing processor. This external hearing processor is situated behind the auricula just above the embedded previously electromagnetic receiver. The implanted internal receiver converts the magnetic signal into an electrical one and directs it to the electrodes penetrating the cochlea (scala tympani). This electrical signal, when routed to the electrode(s), stimulates the remaining healthy auditory nerve fibers of the damaged inner ear
MATERIAL AND METHODS
Until recent days for two years period we had operated 18 children between 2,7 and 4 years old. Combi 40 implant was applied to all patients. Preparation for this operation included conventional otoscopy, computer tomography, stimulation of cochlear nerve and consultation with neurologist. Whole implantations were performed under general anesthesia, combined with topical lidocaine/adrenaline infiltration to prevent excessive bleeding. The consequence of operation included the following steps:
1. After the patient has been anaesthetized, the area to be shaved depends on the type of incision, but usually includes at least a radius of about 8-10 cm around the ear.
2. Plan incision. It is very important to emphasize that choice of line of incision should result well-vascularized skin flap. Making the incision 1-2cm from the implant will ensure that the scar is not lying directly over the body of the implant.
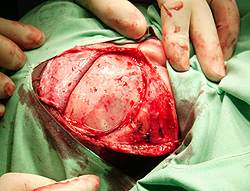
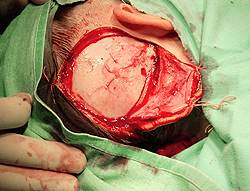
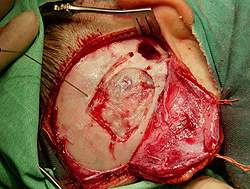
3. Post aural incisions. They start in the sulcus behind the pinna and extend posteriorly. At the first type incision runs parietaly thus forming double skin flap (Fig. 1). At the second, the incision we used runs to occipital region, forming single skin flap (Fig. 2). All four tissue layers, skin, subcutis, muscle and periosteum are incised through with a single cut and the periosteum is freed from the surface of the bone. If there is flap thicker than 5-6 mm, we recommend reducing its thickness to prevent excessive tension.
|
|
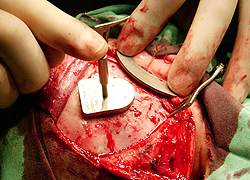
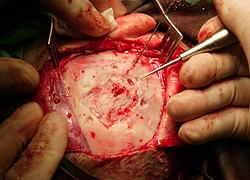
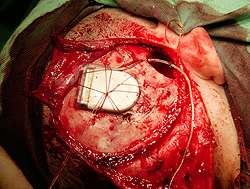
4. Drill implant package bed and electrode array channel. Firstly we have to check position of implant package using special implant template (Fig. 3) Its crucial to say that there must be a 2-2,5 cm distance between implant bed and consequent posterior tympanotomy to avoid undesirable microphony. Note that child's skull bones are extremely delicate and thin so it's not uncommon to reach dura. Finally, using approximately a 0,5 to 1,0 mm burr, suture holes are drilled on both sides of the bed (Fig. 4, Fig. 5). Later two parallel stitches or web stitch are placed over the implant. Usually we use one or two 3/0-2/0 Vycril threads to secure implant package in the scull bed (Fig. 6).
5. Drill mastoidectomy and posterior tympanotomy. A classical cortical mastoidectomy is performed with cutting burr. The fossa incudis should be located, and the tip of the short process of the incus is identified to ensure the proper orientation of posterior tympanotomy. Drilling a triangular opening between n. facialis and chorda tympani to make foramen rotundum visible performs the aforementioned. The following should be recognized after the posterior tympanotomy: the long process of the incus, the incudostapedial joint, stapes pyramid and stapedius tendon, the promontory and the round window niche.
|
|
6. Drill cochleostomy. The beginning of this stage is marked by deperiostation of promontory and analyzing the way of scala tympani penetration. The round window niche is identified and the cochleostomy is made anterior to it. We have used the width of stapes as measuring tool (Fig 7). Our cochleostomias were made inferior to the stapedial tendon at distance twice the width of the stapes and anterior to the round window. Making an oblique 1,2 mm promontorial hole is more than recommended to ensure proper active electrode implementation. One of the most serious difficulties which we have had inspired was the anterior situated position of facial nerve (1,2). Such condition did not permit suitable active electrode implementation.
7. Insert electrode array. The electrode array is held very carefully with special surgical claw, very similar to fine Bellucci forceps. The tip of the electrode is guided with the special claw towards the cochleostomy, in extremely gently manner until the whole 12 channels (31 mm) are inserted properly (3). It is essential that the electrode contacts be not mechanically damaged.
8. Telemetry. The COMBI 40+ Cochlear implant system used with MedEl's telemetry system TELESYS ® allows fast and easy verification of cochlear implant integrity. These means:
· Individual electrode impedance measurements;
· Verification of absence of short and open circuits, between electrodes;
· Determination of intracochlear voltage distribution;
· Measurements of the waveform and electrode configuration;
· Direct evaluation of stapedial reflex, after cochlear nerve stimulation.
|
|
9. Secure electrode array. Once the electrode array has been inserted into the cochlea, it should be fixed so that no postoperative movement will occur. As the electrode array enters the mastoid it can be tied loosely to the cortical overhang. We use additional fixation of electrodes in the posterior tympanostomy with bone dust. In the begging we used Tissacol® fibrin glue. The excess array is looped in the mastoid cavity. The reference electrode is placed into the channel drilled in the mastoid and cloverleaf electrode contact is placed under the periosteum of the temporalis muscle in a tunnel created with a blunt elevator.
10. Close wound. The wound should be closed in layers - firstly a tight closure of the periosteum, and than the skin. Care should be taken not to shear the body of the electrode. Eventually, where there is no excessive bleeding we leave the wound without drainage. The area of the wound is covered with compress and sterile hypoallergenic gauge applying even pressure. Definitive removal of the stitches should occur after 7-8 days under general anesthesia.
DISCUSSION
We present you our work on first 17-18 cochlear implants that has been implemented at ENT Department of "Queen Joanna" University Hospital, Sofia, Bulgaria. We wish to share our difficulties and disappointments that took place in the operating theatre and postoperative period.
Case 1. After 6 months of successful postoperative period, suddenly a skin necrosis has occurred just above the implant bed. It was distributing until the whole implant has been totally naked off. Our reaction was to cover the implant by a rotatory flap, though with no effect. 3 months later, Prof. Tzenev was extracted the implant from its bedside, and placed it again at the opposite ear. For pity that was the first operated in Bulgaria kid by Prof. Profan. That's why the second implant sponsored by MedEl didn't work properly although the intra-operative telemetric data was giving optimistic evidences of normal working device. We decided to send the little patient to Prof. Steinner from Wien, where the child was implanted for the third time - the same ear with skin necrosis. Now the implant is at a perfect condition and rehabilitation of the child is successfully continuing in his own town - Smolyan.
Case 2. At this child, during the posterior tympanotomy we found an anterior situated facial nerve. This anatomical variant has required decortication of the bony channel. This had led to a transitory peripheral facial palsy that disappeared soon after the activation of the electrodes. Now the child has a perfect audition.
Case 3. Martin. MedEl professionals called this child "A Star" because of his extremely rapid progress after the implantation of the first implant. 6-7 months later they took decision to grant at no cost Martin with another implant. Unfortunately a year and a half later one of the stimulants, for all of a sudden ceased its normal work. After an internal MedEl consult, the men from the hearing factory donated another device. I'd like to assure colleagues that during the reoperation, the previous mastoidectomy was completely obliterated by new bone deposits, so we had to drill a posterior tympanotomy de novo. There weren't any intra- and postoperative complications and both implants are doing their best nowadays.
|
CONCLUSION
At the end we have to emphasize once again that the cochlear implant is the only alternative for individuals with profound hearing impairment with preserved auditory nerve functions.
REFERENCES
Cummings ChW, Frederickson JM, Harker LA et al. Cochlear implants. JORL H&NS 1993;4:3142-52.
Tzenev I. Surgical aspects of cochlear implantation. Otorhinolaryngology 1999;3:3-7.
Gstottner WK, Baumgartner WD, Hamzavi J et al. Erste Erfarungen mit dem Combi 40 Cochlearimplantant. HNO 1997;45:17-21.
|
Pro Otology |
Journal Home Contents Preview Next |